Note
Click here to download the full example code
Manipulate Morphology#
Prune, resample, smooth and reshape neuron morphology.
See the API reference for a complete list of available functions.
Some manipulations work on all (or most) neuron types; others only make sense for a specific type - rerooting, for example, only applies to a navis.Skeleton. As a rule of thumb, a generically named function like downsample_neuron accepts multiple types, while a specialized one like reroot_skeleton is type-specific. Depending on your data you may therefore need to convert between neuron types first.
This tutorial covers the operations below - the table doubles as an index and shows which neuron types each supports:
| Operation | Skeleton | Mesh | Dotprops | Voxels |
|---|---|---|---|---|
Reroot (reroot_skeleton) | ✅ | — | — | — |
Downsample (downsample_neuron) | ✅ | ✅ | ✅ | ✅ |
Resample (resample_skeleton) | ✅ | — | — | — |
Smooth (smooth_skeleton / smooth_mesh / smooth_voxels) | ✅ | ✅ | — | ✅ |
Cut & prune (cut_skeleton, prune_twigs) | ✅ | ✅ | — | — |
Subset to volume (in_volume) | ✅ | ✅ | ✅ | ✅ |
Cutting or pruning a navis.Mesh operates on its skeleton and propagates the changes back to the mesh, so the result may not be perfect (e.g. not watertight).
Rerooting#
navis.Skeletons are hierarchical trees and as such typically have a single "root" node (fragmented neurons will have multiple roots). The root is important because it is used as the reference/origin for a bunch of analyses such as Strahler order. Typically, you want the root to be the soma. Because the root is so important, Skeleton can be rerooted:
import navis

n = navis.example_neurons(1, kind="skeleton")
print(n.soma)
Out:
4177
.soma returns the node ID of the soma (if there is one) and can be used to reroot
navis.reroot_skeleton(n, n.soma, inplace=True)
Note
The root is implicitly also important for navis.Mesh because we're using their skeleton representations for a couple operations/analyses!
Simplifying#
Downsampling/simplifying is handy before, say, plotting large lists of neurons. It works on all neuron types (see the table at the top), though the implementation differs per type.
For Skeletons downsampling means skipping N nodes (here 10):
sk = navis.example_neurons(n=1, kind="skeleton")
print(sk.n_nodes)
Out:
4465
sk_downsampled = navis.downsample_neuron(sk, downsampling_factor=10, inplace=False)
print(sk_downsampled.n_nodes)
Out:
1314
Counting nodes is not the only way to go about it, though: it spends the same number of nodes on a dead-straight stretch of backbone as on a tight curve. Skeletons can also be thinned by shape, via the method parameter:
method | Keeps a node when... |
|---|---|
"rdp" (Ramer-Douglas-Peucker) | ...removing it would move the traced path by more than the tolerance. Straight runs collapse to their two ends; a curve keeps every node it needs |
"vw" (Visvalingam-Whyatt) | ...it is not the node adding the least area to the path. Sheds detail more evenly when pushed hard, where "rdp" will happily keep one spike and flatten everything around it |
For these, downsampling_factor is read as a distance tolerance in the neuron's own units - roughly "how far may the simplified neuron stray from this one" - rather than as a factor. So, like resampling below, it takes a unit string:
sk_rdp = navis.downsample_neuron(sk, "0.5 micron", method="rdp", inplace=False)
print(sk_rdp.n_nodes)
Out:
1362
Both are worth a look side by side at roughly the same node budget. The tolerance-based one spends its nodes where the neuron actually bends:
import matplotlib.pyplot as plt

fig, axes = plt.subplots(1, 2, figsize=(12, 5))

for ax, nrn, title in zip(
    axes,
    [sk_downsampled, sk_rdp],
    [f"Downsampled 10x ({sk_downsampled.n_nodes} nodes)", f"RDP, 0.5um ({sk_rdp.n_nodes} nodes)"],
):
    _ = navis.plot2d(
        nrn.nodes[["x", "y", "z"]].values,
        method="2d",
        view=("x", "-z"),
        scatter_kws=dict(c="green", s=1),
        ax=ax,
    )
    ax.set_title(title, color="k")
    ax.invert_yaxis()
    ax.set_axis_off()

plt.tight_layout()
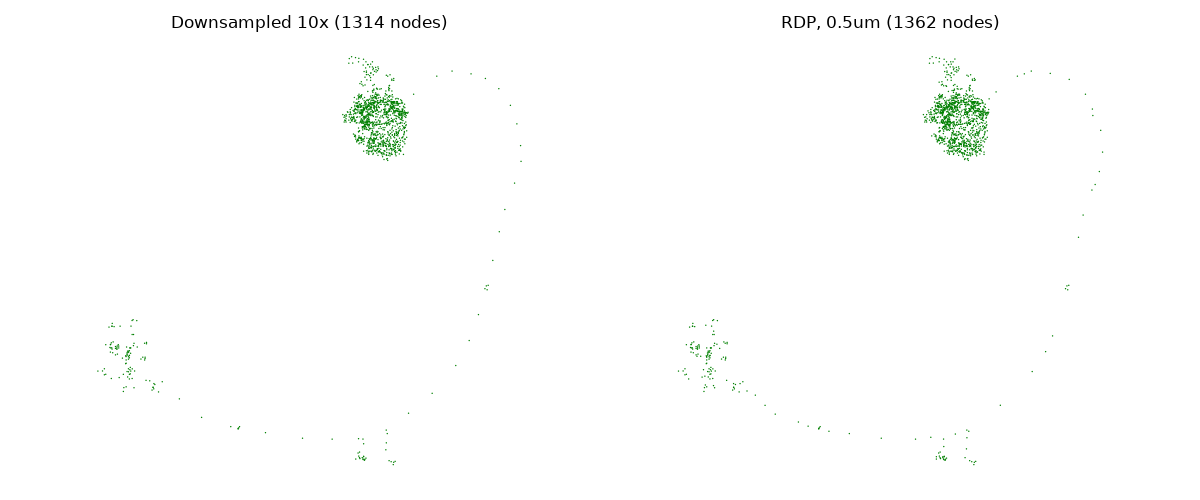
Downsampling shortens a skeleton
Whichever method you pick, the nodes that survive keep their original coordinates - so the edges that replace a dropped chain cut its corners, and cable_length falls with them (by 5-7% on this neuron at the settings above, and by more the harder you simplify). If you need a node count you choose and the cable length left intact, resample instead - see below.
For Meshes downsampling will reduce the number of faces by a factor of N:
me = navis.example_neurons(n=1, kind="mesh")
print(me.n_faces)
Out:
35106
me_downsampled = navis.downsample_neuron(me, downsampling_factor=10, inplace=False)
print(me_downsampled.n_faces)
Out:
3510
Note
Under the hood downsample_neuron calls navis.simplify_mesh for Meshes. That runs on navis-fastcore and needs nothing else installed. Because it tracks where every vertex went, connectors, extra edges and the skeleton correspondence come through the simplification with it.
Resampling#
Skeletons can also be "resampled" (up or down) to a given resolution (i.e. distance between nodes):
sk = navis.example_neurons(n=1, kind="skeleton")
print(sk.sampling_resolution * sk.units)
Out:
477.4501647949219 nanometer
Note that we can provide a unit ("1 micron") here because our neuron has units set:
sk_resampled = navis.resample_skeleton(sk, resample_to="1 micron", inplace=False)
print(sk_resampled.sampling_resolution * sk_resampled.units)
Out:
895.2661743164062 nanometer
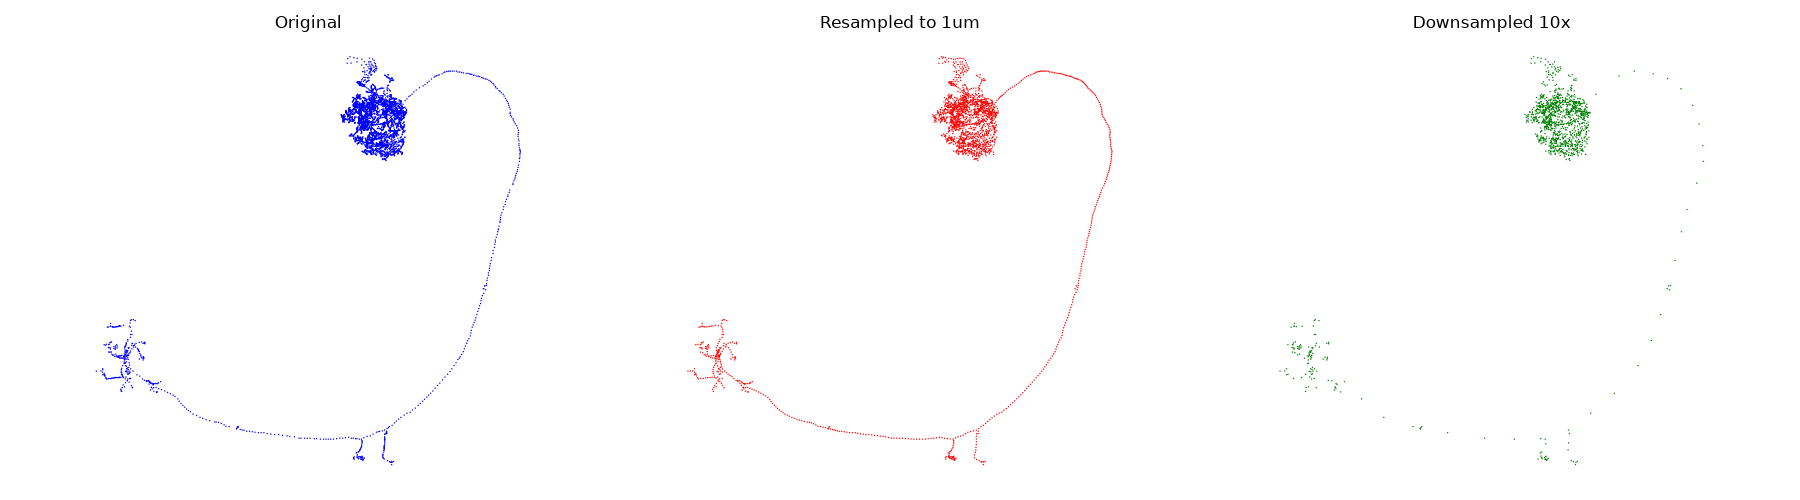
Comparing the original, resampled and downsampled skeletons side by side:
import matplotlib.pyplot as plt

nodes_original = sk.nodes[["x", "y", "z"]].values
nodes_downsampled = sk_downsampled.nodes[["x", "y", "z"]].values
nodes_resampled = sk_resampled.nodes[["x", "y", "z"]].values

fig, axes = plt.subplots(1, 3, figsize=(18, 5))

_ = navis.plot2d(
    nodes_original,
    method="2d",
    view=("x", "-z"),
    scatter_kws=dict(c="blue"),
    ax=axes[0],
)
_ = navis.plot2d(
    nodes_resampled,
    method="2d",
    view=("x", "-z"),
    scatter_kws=dict(c="red"),
    ax=axes[1],
)
_ = navis.plot2d(
    nodes_downsampled,
    method="2d",
    view=("x", "-z"),
    scatter_kws=dict(c="green"),
    ax=axes[2],
)

for ax, title in zip(axes, ["Original", "Resampled to 1um", "Downsampled 10x"]):
    ax.set_title(title, color="k")
    ax.invert_yaxis()
    ax.set_axis_off()

plt.tight_layout()
Tip
Click on the image to see it in full resolution.
As you can see the resampling increased the node density in the backbone and decreased it in the finer neurites to bring things on par. Downsampling just thinned out the nodes across the board.
Resampling regenerates node IDs
Nodes are not merely moved around to match the desired resolution - they are regenerated from scratch. As a consequence, the original node IDs are (with a few exceptions) all gone.
%%
Smoothing#
Smoothing works on all neuron types, but the approaches differ so much that each has its own function. Pick the tab for your neuron type:
navis.smooth_skeleton averages along the linear segments, over a window of window nodes centred on each node:
sk = navis.example_neurons(n=1, kind="skeleton")
sk_smoothed = navis.smooth_skeleton(sk, window=5, inplace=False)
sigma instead for a Gaussian kernel whose width is a distance along the neurite rather than a count of nodes - so the amount of smoothing stays the same if you resample the skeleton, which is usually what you want: sk_smoothed = navis.smooth_skeleton(sk, sigma=2000, inplace=False) # nm
to_smooth to smooth some other numeric column, e.g. to_smooth="radius". navis.smooth_mesh runs a filter over each vertex's neighbours, by default Taubin's - which alternates a shrinking pass with an inflating one so that the mesh does not deflate as it smooths:
me = navis.example_neurons(n=1, kind="mesh")
me_smoothed = navis.smooth_mesh(me, iterations=5, inplace=False)
method="laplacian" gets you the plain diffusion step (simpler, and it shrinks - pair it with volume_correction=True) and method="humphrey" the HC filter, which is the gentlest of the three on fine detail. navis.smooth_voxels applies a Gaussian filter to the voxel grid:
vx = navis.voxelize(navis.example_neurons(n=1, kind="mesh"), pitch="1 micron")
vx_smoothed = navis.smooth_voxels(vx, sigma=2, inplace=False)
Running the skeleton smoother on a real neuron:
sk = navis.example_neurons(n=1, kind="skeleton")
sk_smoothed = navis.smooth_skeleton(sk, window=5, inplace=False)
sk_smoothed
Cutting & Pruning#
Cutting and pruning work best if there is a sense of topology which implicitly requires a skeleton. Many functions will also work on Meshes though. That's because the operation is performed on their skeleton and changes are propagated back to the mesh. Fair warning though: this may not be perfect (e.g. the resulting mesh might not be watertight) - should be good enough for a first pass though!
Start with the simplest case: cutting a skeleton in two at a given node.
# Load the neuron
n = navis.example_neurons(1, kind="skeleton")

# Pick a node ID
cut_node_id = n.nodes.node_id.values[333]
distal, proximal = navis.cut_skeleton(n, cut_node_id)
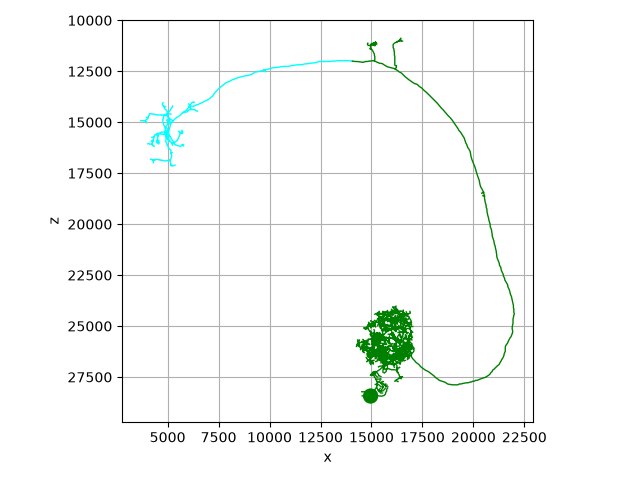
Plot the two fragments:
# Note that we are using method='2d' here because that makes annotating the plot easier
fig, ax = distal.plot2d(color="cyan", method="2d", view=("x", "-z"))
fig, ax = proximal.plot2d(color="green", ax=ax, method="2d", view=("x", "-z"))

# Annotate cut point
cut_coords = distal.nodes.set_index("node_id").loc[distal.root, ["x", "z"]].values[0]
ax.annotate(
    "cut point",
    xy=(cut_coords[0], -cut_coords[1]),
    color="lightgrey",
    xytext=(cut_coords[0], -cut_coords[1] - 2000),
    va="center",
    ha="center",
    arrowprops=dict(shrink=0.1, width=2, color="lightgrey"),
)

plt.tight_layout()
If instead of a node ID, you have an x/y/z coordinate where you want to cut: use the .snap method to find the closest node to that location:
node_id, dist = n.snap([14000, 16200, 12000])
print(f"Closest node: {node_id} at distance {dist * n.units:.2f} {n.units.units}")
Out:
Closest node: 334 at distance 565.69 nanometer nanometer
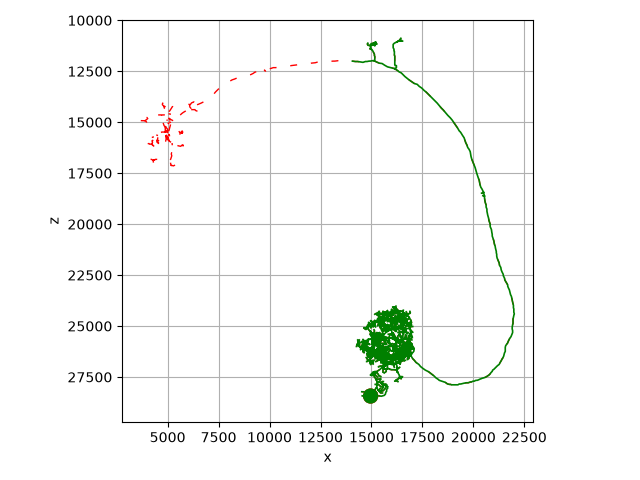
Instead of cutting a neuron in two, we can also just prune bits off:
n_pruned = n.prune_distal_to(cut_node_id, inplace=False)

cut_coords = n.nodes.set_index("node_id").loc[cut_node_id, ["x", "z"]].values

# Plot original neuron in red and with dotted line
fig, ax = n.plot2d(color="red", method="2d", linestyle=(0, (5, 10)), view=("x", "-z"))

# Plot remaining neurites in red
fig, ax = n_pruned.plot2d(color="green", method="2d", ax=ax, view=("x", "-z"), lw=1.2)

# Annotate cut point
ax.annotate(
    "cut point",
    xy=(cut_coords[0], -cut_coords[1]),
    color="lightgrey",
    xytext=(cut_coords[0], -cut_coords[1] - 2000),
    va="center",
    ha="center",
    arrowprops=dict(shrink=0.1, width=2, color="lightgrey"),
)

plt.tight_layout()
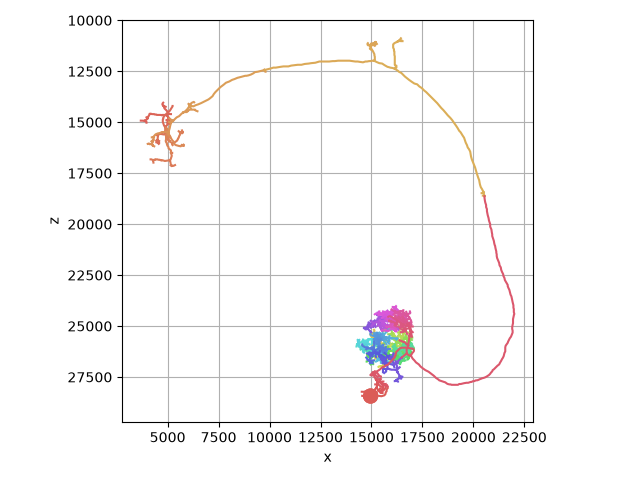
navis.cut_skeleton also takes multiple cut nodes, in case you want to chop your neuron into multiple pieces.
As an (extreme) example, let's cut a neuron at every single branch point:
n = navis.example_neurons(1, kind="skeleton")

branch_points = n.nodes[n.nodes.type == "branch"].node_id.values

cut = navis.cut_skeleton(n, branch_points)
cut.head()
# Plot neuron fragments
fig, ax = navis.plot2d(cut, linewidth=1.5, view=("x", "-z"))

plt.tight_layout()
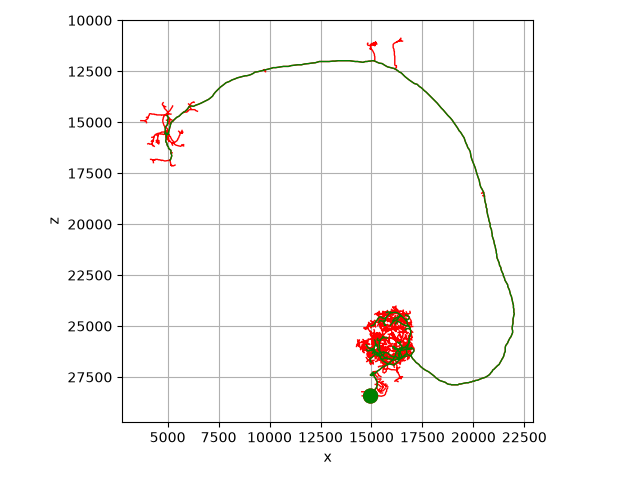
Next, pruning by Strahler index:
# Load a fresh skeleton
n = navis.example_neurons(1, kind="skeleton")

# Reroot to soma
n = n.reroot(n.soma)

# This will prune off terminal branches (the lowest two Strahler indices)
n_pruned = n.prune_by_strahler(to_prune=[1, 2], inplace=False)

# Plot original neurons in red
fig, ax = n.plot2d(color="red", view=('x', '-z'))

# Plot remaining neurites in green
fig, ax = n_pruned.plot2d(color="green", ax=ax, linewidth=1, view=("x", "-z"))

plt.tight_layout()
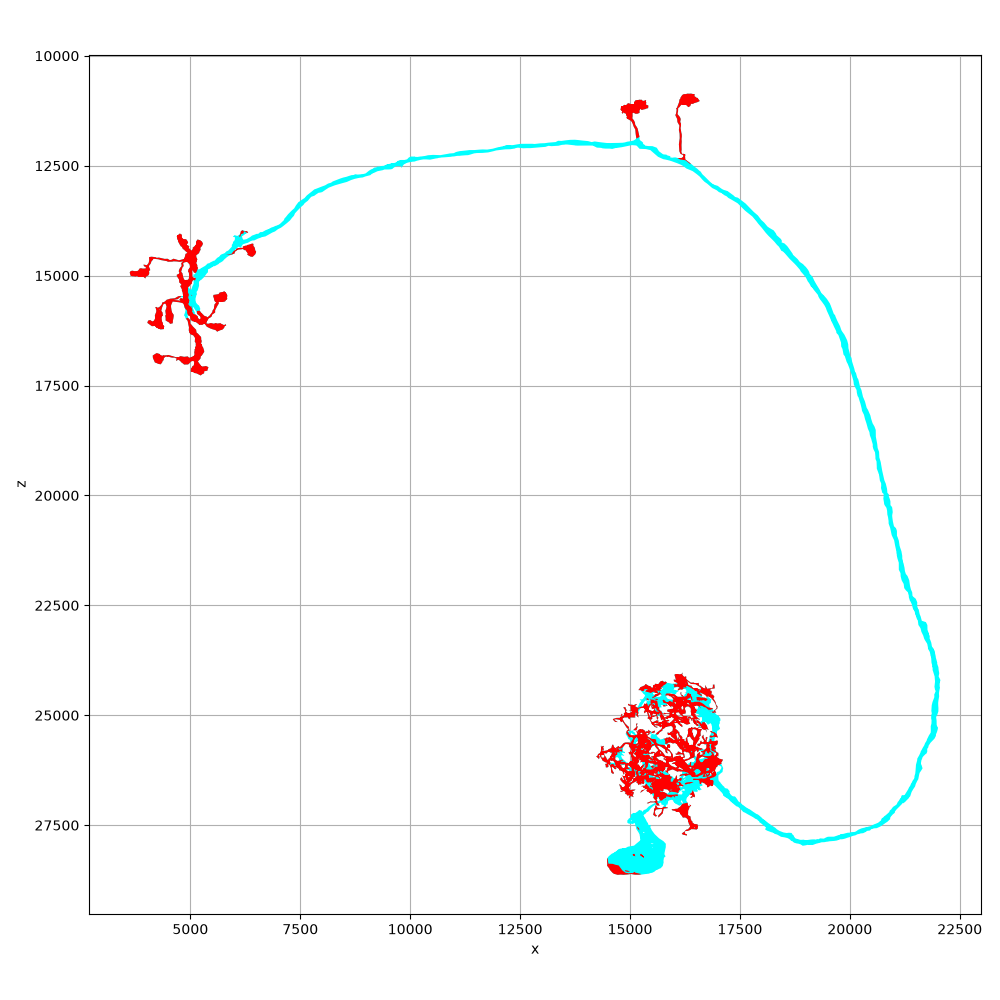
We can also turn this around and remove only the higher order branches. Let's use this example to show that we can also do this with Meshes:
Load an example mesh neuron
m = navis.example_neurons(1, kind="mesh")

# This will prune to the just terminal branches
m_pruned = navis.prune_by_strahler(m, to_prune=range(3, 100), inplace=False)

# Plot original neuron in cyan
fig, ax = m.plot2d(color="cyan", figsize=(10, 10), view=("x", "-z"))

# Plot remaining neurites red
fig, ax = m_pruned.plot2d(color="red", ax=ax, view=("x", "-z"))

plt.tight_layout()
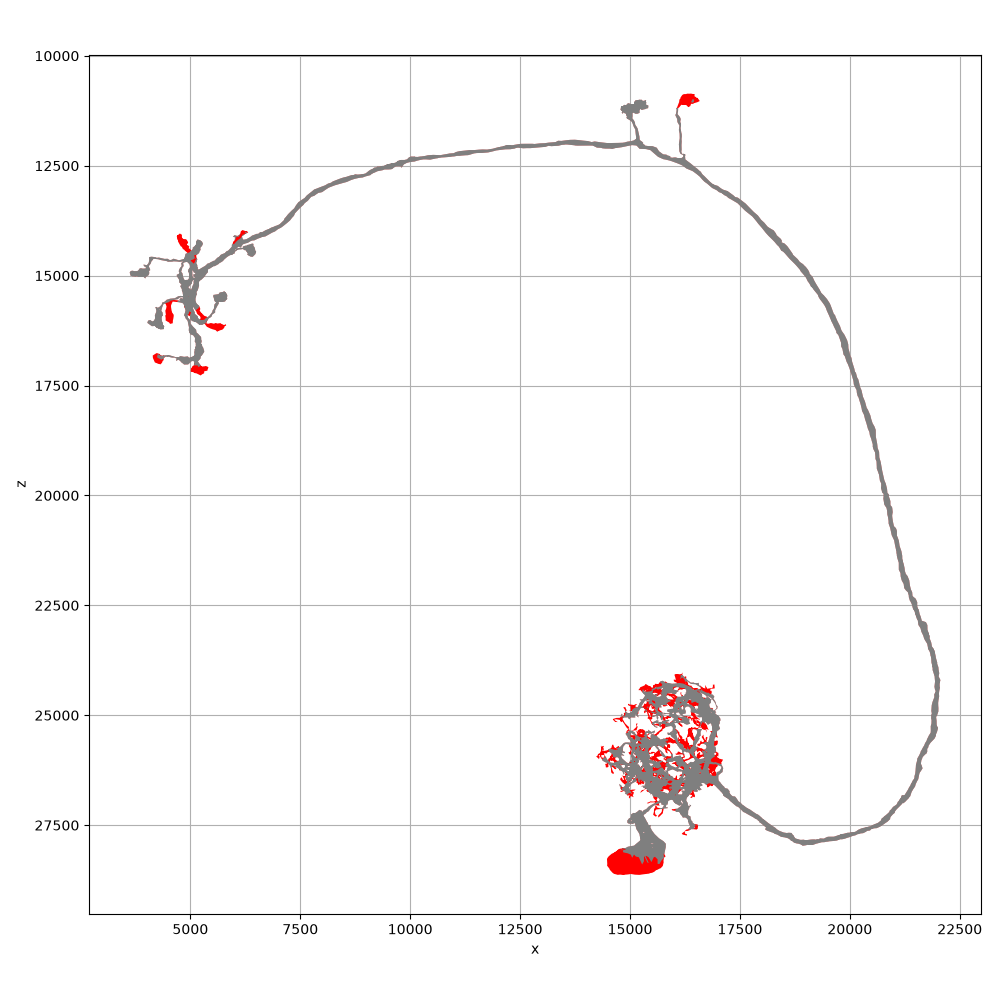
Alternatively, we can prune terminal branches based on size:
# This will prune all branches smaller than 10 microns
m_pruned = navis.prune_twigs(m, min_length="10 microns", inplace=False)

# Plot original neuron in red
fig, ax = m.plot2d(color="red", figsize=(10, 10), view=("x", "-z"))

# Plot remaining neurites in cyan
fig, ax = m_pruned.plot2d(
    color="cyan", ax=ax, linewidth=0.75, alpha=0.5, view=("x", "-z")
)

plt.tight_layout()
Intersecting with Volumes#
We can also intersect neurons with navis.Volume (and trimesh.Trimesh for that matter). This is useful e.g. to subset a neuron to a certain brain region:
Load an example navis.Volume
lh = navis.example_volume("LH")

# Prune by volume
m_lh = navis.in_volume(m, lh, inplace=False)
m_outside_lh = navis.in_volume(m, lh, mode="OUT", inplace=False)
And plot!
Plot pruned branches neuron in green
fig, ax = navis.plot2d(
    [m_lh, m_outside_lh, lh], color=["red", "green"], figsize=(10, 10), view=("x", "-z")
)

plt.tight_layout()
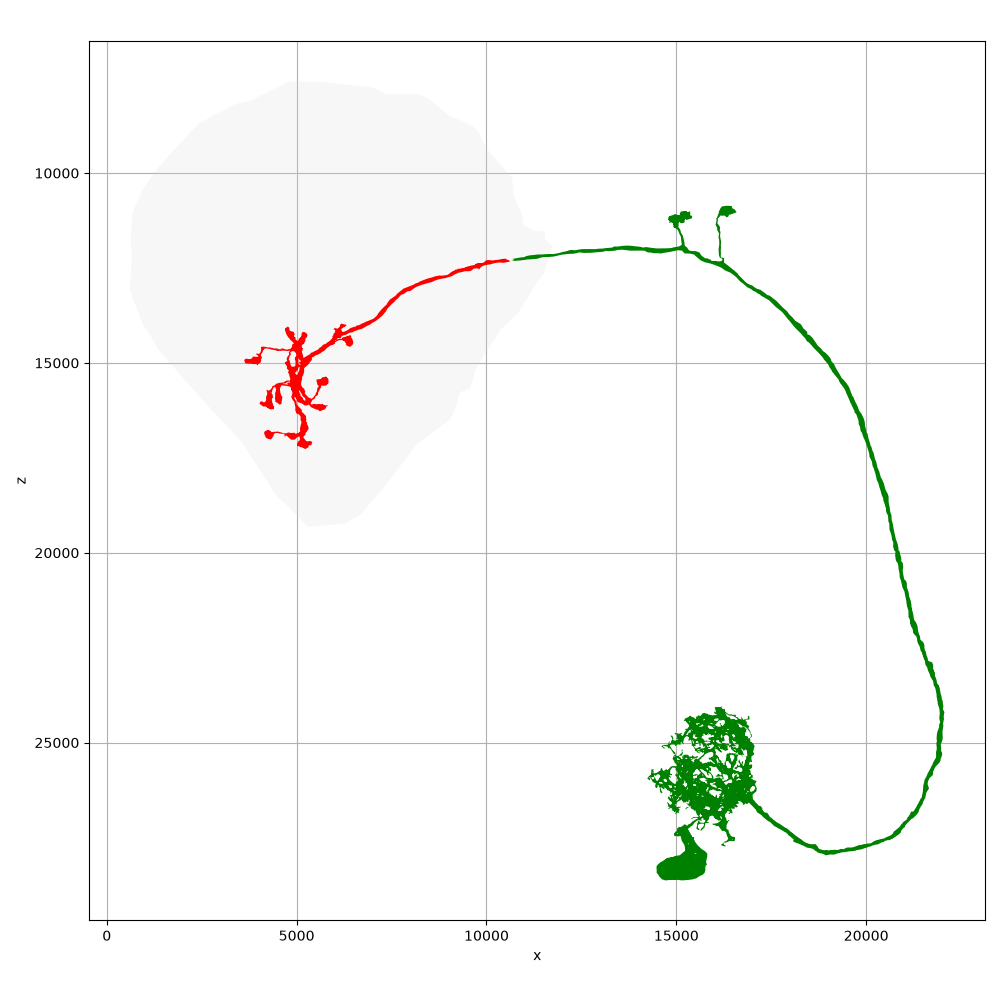
As the table at the top of this tutorial shows, not every operation applies to every neuron type: Dotprops and Voxels can't be cut, for example, but they can be subset to a volume. See the API reference for the full matrix.
# Note that [`navis.in_volume`][] also works with arbitrary spatial data (i.e. `(N, 3)` arrays of x/y/z locations):
Get the connectors for one of our above skeletons
cn = sk.connectors

# Add a column that tells us which connectors are in the LH volume
cn["in_lh"] = navis.in_volume(cn[["x", "y", "z"]].values, lh)
cn.head()
Count the number of connectors (pre and post) in- and outside the LH:
cn.groupby(["type", "in_lh"]).size()
Out:
type  in_lh
post  False    1978
      True      106
pre   False     325
      True      296
dtype: int64
About half the presynapses are in the LH (most of the rest will be in the MB calyx). The large majority of postsynapses are outside the LH in the antennal lobe where this neuron has its dendrites.
That's it for now! Please see the NBLAST tutorial for morphological comparisons using NBLAST and the API reference for a full list of morphology-related functions.
Total running time of the script: ( 0 minutes 8.773 seconds)
Download Python source code: tutorial_morpho_00_manipulate.py
Download Jupyter notebook: tutorial_morpho_00_manipulate.ipynb